How to update an HTML image gallery (PHP tutorial)

In this tutorial I’ll walk you through the steps involved in building a databaseless PHP admin section for Smooth Gallery. When done, without much effort you should be able to adapt the code to fit any similar JavaScript image gallery(/slider/switcher/swapper… whatever). So let’s take a look at it:
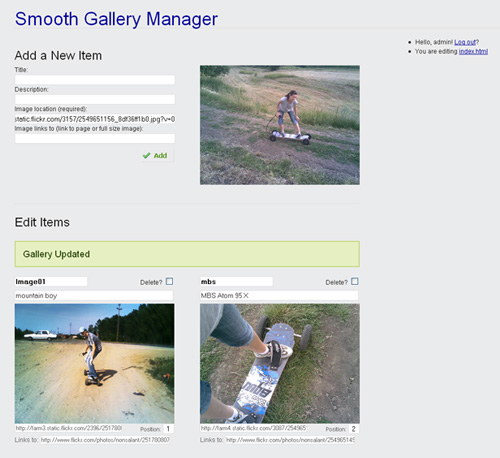
Smooth Gallery Manager

As mentioned on the manager page, the password is “demo” and you don’t have sweat about removing/adding/reordering images—the manager in the demo resets the file to an initial input each time a user logs in. For faster testing: right click some photo from the internet, select copy image location and paste it in the Add New Item/Image location field (that’s the only required field). Then press Add. Then in the Edit Items part copy and paste image locations from one item to another and then update it.

You will want to download the gallery + manager before continuing. After you do, open up manager.php and follow along. Only the more important parts ware discussed below, the rest is commented in the file.

So how come no databases?

It’s an image gallery, it’s not gonna have thousands of entries. There’s not much justification in creating a database for 5-20 items. We’ll keep it all in the HTML. And this will give us a chance to work with a really neat tool: PHP Simple HTML DOM Parser. This HTML parser written in PHP5+ is going to save us a lot of work. And I think this won’t be the last you hear of it here on Vile Works.

1. The logic behind it, in plain English

We’re going to have a simple log in/log out functionality, we don’t want anyone who knows the manager’s URI to be able edit our gallery. After the log in, two main options will be available: add new item and edit existing items. …And a log out link.

if logged in
	if received 'add item'
		add the item;
	display 'add item' form;
	if received 'update items'
		update all the items;
	display 'update items' form;
	display 'log out' link;
else
	display 'log in' form;

The conditioned actions “if received ‘add item’ -> add the item” and “if received ‘update items’ -> update the items” are placed in the code before their forms so that they will display a success or error message in the page just above the form that was submitted. The “add new item” functionality will add a new item at the beginning of the gallery: the image along with its title, description and a link to another page. The “update items” will allow us to:

  • change the items’ titles, descriptions, images and the URL the images link to
  • delete items
  • and to reorder the items

Read moreHow to update an HTML image gallery (PHP tutorial)

Using captcha without displaying it

How I use captcha without making my users complete the barely readable word

Capthca sucks. For more information on how much captcha can suck see John Willis’ post Top 10 Worst Captchas.Bad Captcha
But at the same time it can be really annoying for webmasters to have their forms unprotected with all the spam bots running free out there.

What I wanted was to have the commenting feature protected against spam bots without having the innocent human users ruining their eyes on captcha like images, or complete any mathematical equation or any other additional question fields.

One very important difference between a spam bot and a human using a web browser is that the first can’t run JavaScript code. However, this isn’t a perfect criteria of selection, because there are humans browsing the web using browsers without JavaScript support (Opera Mini for mobile devices for example).

My ideea (and as I did some Google searches, I found out other people had similar ideas) was the followig algorithm:

Does the user have JavaScript enabled?
If yes, he’s ok. Let him comment.
No? He’s a suspect. Read him his rights and give him the ultimate “are you human?” test.

To do this I left the captcha system enabled and in place and wrote 2 extra lines of JavaScript that:

//complete the text field with the correct word from the image:
$('secretword').value='nospam';
//hide the div containing the captcha image and the text field:
$('captcha').style.display='none';

Read moreUsing captcha without displaying it

Create an old map of your location

Put your city on the map in 4 layers. Create an artistic old map of your area. Here’s what you should be achieving:

psd map tutorial step5

Step 1: Getting the actual map

Go to Google Maps, find your area and zoom in to a desired level—I went in somewhere between City and Street view in some area in Bucharest, Romania but you can also do a Country view.

Update: Simon suggests in a comment below that to avoid any legal implications in using a screen capture from Google or Yahoo Maps in your artwork, you should rather go with an open map provider such as openstreetmap.org.

Hit the PrintScreen key, go in Photoshop and paste it in a new document and then Crop (C key) the image keeping only the desired part. Use the Patch Tool or the Healing Brush Tool to remove the center cross.

psd map tutorial

Step 2: Applying the old paper texture to give it a vintage look

For the second step you need an old grunge paper texture. I used this free image from cgtextures.

Read moreCreate an old map of your location

Reasons not to use flash

Why shouldn’t you use flash for your website? Can there be anything wrong with a website that “enhances” the user experience by flying/zooming/swirling/flipping in like a .PPS document? Well, besides the lack of SEO, low usability (for example: back button not working, “find on this page” not working, the “make text bigger/smaller” button not working … Read more